Suggestion: confirmation dialog for saving the same data under a new filename

Hi SweepMe team.

We regularily use SweepMe to record single sweep measurements on multiple testpoints of one PCB with repetitions for each parameter variation within the test setup. It is not uncommon to do over 200 single measurements this way.

Previously, we used Keysight’s EasyEXPERT group+ software in combination with our SMUs but since we switched over to SweepMe for pretty much everything else, we do those recordings in SweepMe now as well.

As these tests are done manually by humans, mistakes happen. One trap that we constantly fall into is that to safe time, we do the renaming of the filename according to the testpoint currently being measured while the data is recorded. If one either forgets to start the measurement or misses the button/key combination to do so and still changes the filename follwed by saving the data, chances are that one won’t notice this mistake as the old data just gets saved again using the new filename without confirmation. It would be nice if SweepMe would ask for confirmation if it is requested to safe the same, old data under a new filename. It should be easy to set a flag that is getting removed as soon as a new measurement is started.

In addition, running the test on the new testpoint and trying to save it with the already given filename will issue a dialog box with the option to assign a sequenced number to it, but no way to just overwrite it. I understand that is is probably to secure existing data, but the user should be offered to do so at least within the appearing dialog box so no extra tour to the filemanager is required.

Best wishes,
Christian

1 Like

Hi Christian,

thanks a lot for the user feedback.

I have a created a backlog item. A check to test whether data was already saved should not be a big deal. Still, it might take some time until the feature is processed as others are already pending.

In the meantime, you might use some other solutions:

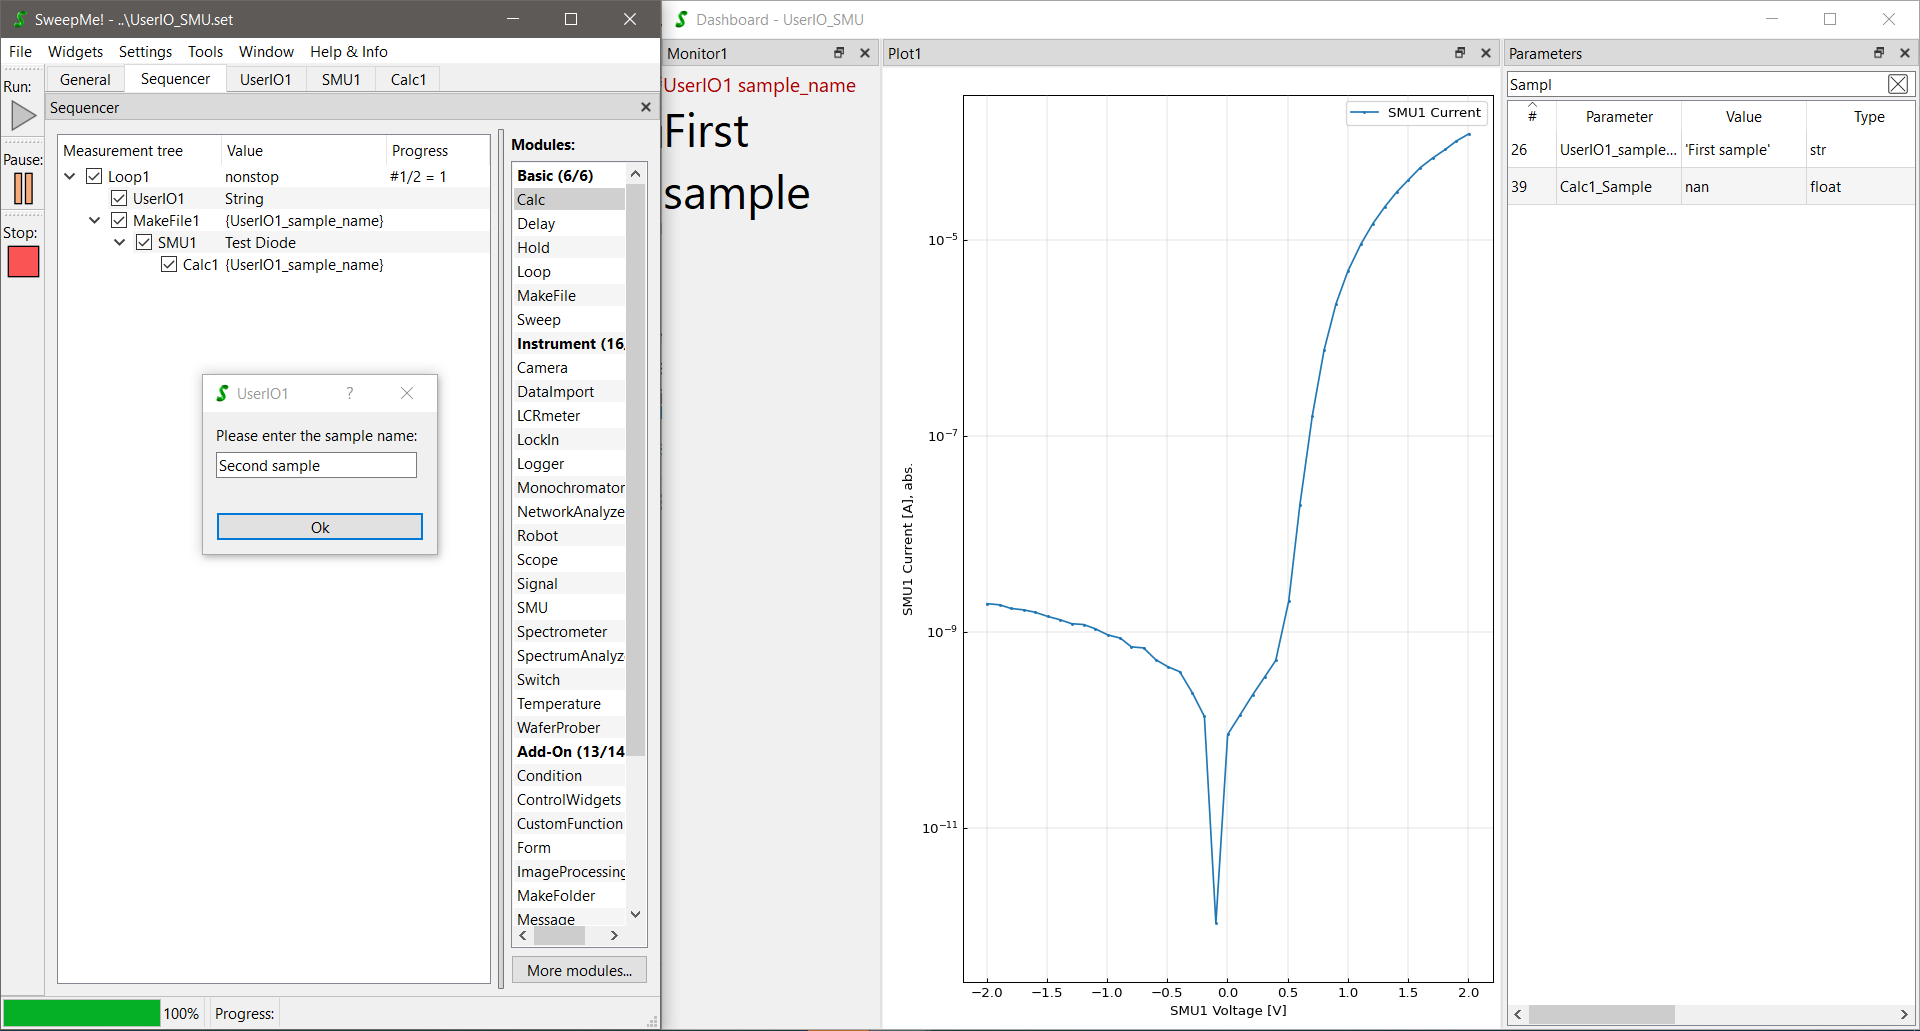
In the screenshot, the add-on module UserIO is used to create a user input dialog for each repetition of Loop1. Here, the user can enter the next sample name.

In a second branch, the real measurement is performed. A MakeFile module can customized to automatically add the sample name to the file name and a Calc module can be used to add the sample name also as “measurement data” into the file.

Instead of saving every single measurement, this routine automatically saves the data for each iteration into a separate file. The user only needs to save once at the end of the entire measurement to copy all data from the temporary data folder to the final measurement data folder.

The above solution does not support to enter the name while the measurement is running, but at least it could add some more safety by always asking for the sample name before the measurement continues.

Here is the procedure of the screenshot that you can copy and paste into the sequencer to try it yourself.

{
  "child_items": [
    {
      "child_items": [
        {
          "child_items": [],
          "is_checked": true,
          "is_expanded": true,
          "module_details": {
            "module_type": "UserIO",
            "Label": "UserIO1",
            "value": "",
            "Type": "String",
            "Message": "Please enter the sample name:",
            "Variable": "sample_name",
            "Unit": "",
            "Maximum": "",
            "Minimum": "",
            "Choices": "",
            "Blocking": true,
            "Autoclose": true,
            "Comment": ""
          }
        },
        {
          "child_items": [
            {
              "child_items": [
                {
                  "child_items": [],
                  "is_checked": true,
                  "is_expanded": true,
                  "module_details": {
                    "module_type": "Calc",
                    "Label": "Calc1",
                    "value": "",
                    "Variable": "Sample",
                    "Unit": "",
                    "Function": "{UserIO1_sample_name}",
                    "Plot": true,
                    "Save": true,
                    "Execution": "Always",
                    "Value1": "UserIO1 sample_name",
                    "Value2": "",
                    "Value3": "",
                    "Comment": ""
                  }
                }
              ],
              "is_checked": true,
              "is_expanded": true,
              "module_details": {
                "module_type": "SMU",
                "Label": "SMU1",
                "value": "",
                "Device": "SMU-Simulation_Diode",
                "Channel": "",
                "Port": "",
                "SweepValue": "SweepEditor",
                "SweepMode": "Voltage in V",
                "RouteOut": "Rear",
                "4wire": false,
                "Compliance": "0.001",
                "SkipCompliance": false,
                "Speed": "Fast",
                "Range": "0",
                "RangeVoltage": "Auto",
                "Average": 1,
                "Configuration": "",
                "PostProcessingResistance": false,
                "PostProcessingConductance": false,
                "PostProcessingPower": false,
                "ShowPulse": false,
                "CheckPulse": false,
                "PulseCount": 1,
                "PulseOffLevel": "0",
                "PulseOnTime": "200e-6",
                "PulseOffTime": "200e-3",
                "PulsePeriod": "1e-3",
                "PulseDelay": "0.0",
                "PulseMeasStart": 50,
                "PulseMeasTime": 30,
                "PulseRiseTime": "100e-9",
                "PulseFallTime": "100e-9",
                "PulseImpedance": "200e-3",
                "SweepEditor": {
                  "sweeps": [
                    {
                      "loop": "1",
                      "start": "-2.0",
                      "end": "2.0",
                      "step_points": "0.1",
                      "scaling": "Step width",
                      "hold": "0.1"
                    }
                  ]
                },
                "ListSweepCheck": true,
                "ListSweepType": "Sweep",
                "ListSweepStart": "0.0",
                "ListSweepEnd": "1.0",
                "ListSweepStepPointsType": "Step width:",
                "ListSweepStepPointsValue": "0.1",
                "ListSweepDual": false,
                "ListSweepCustomValues": "",
                "ListSweepHoldtime": "0.1",
                "ListSweepDelaytime": "0.1",
                "Comment": ""
              }
            }
          ],
          "is_checked": true,
          "is_expanded": true,
          "module_details": {
            "module_type": "MakeFile",
            "Label": "MakeFile1",
            "value": "{UserIO1_sample_name}",
            "FileID": "{UserIO1_sample_name}",
            "ShowAdvancedOptions": true,
            "BranchIndex": true,
            "FileIndex": true,
            "ModuleLabels": true,
            "Comment": ""
          }
        }
      ],
      "is_checked": true,
      "is_expanded": true,
      "module_details": {
        "module_type": "Loop",
        "Label": "Loop1",
        "value": "nonstop",
        "Repetitions": "0",
        "UseReduction": false,
        "MaxPoints": 10000,
        "Reduction": "Quadratic",
        "KeepLastPoints": 10,
        "Comment": ""
      }
    }
  ],
  "data_type": "Sequencer",
  "version": "v1"
}
1 Like

Another solution could be using robotics where one needs to define names and measurement points once for each PCB, but if you measure up to 200 times it might be worth to further automate the setups. The measurement points are read in using the add-on module “ReadValues” and are handed over to the Robot module.

We have made good experience with the Dobot MG400

as it has a very good price-performance ratio.

Best, Axel

1 Like

Thanks Axel for your suggestions. Yes, we already thought about implementing a robot driven automation for the testing process but aren’t able to free the required resources at the momtent. But your alternative solution for the time being is worth a try, until the backlog is catched up.

1 Like

Hi Christian,

we have discussed about your issue and there is maybe a simple solution that can help a person running the measurements.

After a measurement, the floppy disc symbol turns orange:

If the data is saved, it turns green:

If the data is not saved successfully, it turns red:

This way a user can check whether the symbol is green. In this case, a new measurement needs to be performed.

A check whether data has been saved under the same name is already implemented.

Regarding the implementation of further “safety” measures, we think about different solutions. One is that the Add-on module “Control Widgets” comes with the possibility to add a “Main control” widget and a “Save bar” widget. These widgets can be configured and here we could add further options that allow to customize the behavior, for example a message when data has been already saved or was not saved yet. Furthermore, it could be helpful to have a filename or folder input field that requests a change if not changed since the last measurement.

2 Likes

That would be a great addition. I understand that the circumstances of our measurement procedures might be special. Therefore, I wouldn’t mind creating a custom solution if these possibilities were offered.

1 Like