Regarding connection to Keithley 2400 Sourcemeter

I’m Avaneesh Ramakrishna Rao, a master’s student @ DCU. I’m currently working on my master’s thesis, where I’m supposed to check the IV characteristics and hence was stuck in understanding how to establish the connection of the Keithley 2400 sourcemeter in Sweepme? It would be very helpful if you could guide me through the settings needed to changed or viewed. Please do the needful.

With regards,
Avaneesh Ramakrishna Rao.

1 Like

Hi Avaneesh,

thanks a lot for creating an issue.

Making a measurement with a Keithley 2400 only takes a few minutes. Here are the typical steps:

  1. Create a new empty setting using the menu “Setings”. The sequencer should now be empty.

  2. Add an “SMU” module to the sequencer

  3. Doubleclick the SMU module or click on the new tab that was created by adding the SMU module that is just right next to the Sequencer tab.

  4. Select the driver in the SMU module. The Keithley 2400 driver is already pre-installed. So you can directly choose it in the list at the field “Device”.

  5. Use the “Find ports” button and select the communication port. This is the step where people encounter most problems. You need to know whether you have Serial communication via a COM port (using a RS-232 adapter) or do you use GPIB. The Keithley 2400 must be configured accordingly via its menu. You read more about it on the dedicated driver page:
    https://sweep-me.net/device/31/Keithley_2400

  6. Select the Sweep mode in the SMU module . Do you like to source Voltage or Current?

  7. The Sweep source is where the set values come from. For a simple IV curve, select the Sweep editor. It is a tool that is part of the SMU module and can be found in the tab “Sweep values” next to the tab “Setup”. Here you can configure for example a sweep from -1 V to 1 V in 0.1 V steps.

  8. You can change other options in the SMU module, but the default options should already work for a first measurement.

  9. You can basically start your measurement. SweepMe! will automatically add a “MakeFile” module to the sequencer above the SMU module that ensures your data will be written to a file during the measurement.

  10. While the measurement is running, you can add a Plot to the dashboard via the menu “Widgets”. A Plot widgets pops up. Just drag and drop it into the dashboard window.

  11. Open the Plot configuration by double click ot the options button in the top right corner. Now, you can define what is presented on the y and x axes.

You can find a video how to create such an SMU measurement on our YouTube channel that explains the essential steps in 60 seconds:
https://youtu.be/joC4RlTFsmk?si=-kQMQX0SpQZI5Db0

I can also recommend our video about “Concept and Handling”:

Furthermore, you can find a recording of the last introduction web seminar where is a walkthough in the second half.

And here you can find a pre-configured measurement. Just copy the string below and paste it via right-click into an empty sequencer.

{
  "child_items": [
    {
      "child_items": [
        {
          "child_items": [],
          "is_checked": true,
          "is_expanded": true,
          "module_details": {
            "module_type": "SMU",
            "Label": "SMU1",
            "value": "",
            "Device": "SMU-Keithley_2400",
            "Channel": "",
            "Port": "COM6",
            "SweepValue": "SweepEditor",
            "SweepMode": "Voltage in V",
            "RouteOut": "Front",
            "4wire": false,
            "Compliance": "0.0001",
            "SkipCompliance": false,
            "Speed": "Fast",
            "Range": "Auto",
            "RangeVoltage": "Auto",
            "Average": "1",
            "Parameters": {},
            "Configuration": "",
            "PostProcessingResistance": false,
            "PostProcessingConductance": false,
            "PostProcessingPower": false,
            "ShowPulse": false,
            "CheckPulse": false,
            "PulseCount": "1",
            "PulseOffLevel": "0",
            "PulseOnTime": "200e-6",
            "PulseOffTime": "200e-3",
            "PulsePeriod": "1e-3",
            "PulseDelay": "0.0",
            "PulseMeasStart": 50,
            "PulseMeasTime": 30,
            "PulseRiseTime": "100e-9",
            "PulseFallTime": "100e-9",
            "PulseImpedance": "200e-3",
            "SweepEditor": {
              "sweeps": [
                {
                  "loop": "1",
                  "start": "-1.0",
                  "end": "1.0",
                  "step_points": "0.1",
                  "scaling": "Step width",
                  "hold": "0.0"
                }
              ]
            },
            "ListSweepCheck": true,
            "ListSweepType": "Sweep",
            "ListSweepStart": "0.5",
            "ListSweepEnd": "1.0",
            "ListSweepStepPointsType": "Step width:",
            "ListSweepStepPointsValue": "0.1",
            "ListSweepDual": false,
            "ListSweepCustomValues": "",
            "ListSweepHoldtime": "0.1",
            "ListSweepDelaytime": "0.1",
            "Comment": ""
          }
        }
      ],
      "is_checked": true,
      "is_expanded": true,
      "module_details": {
        "module_type": "MakeFile",
        "Label": "MakeFile1",
        "value": "ID",
        "FileID": "ID",
        "ShowAdvancedOptions": false,
        "BranchIndex": true,
        "FileIndex": true,
        "ModuleLabels": true,
        "Comment": ""
      }
    }
  ],
  "data_type": "Sequencer",
  "version": "v1",
  "sweepme_version": "1.5.8.7"
}

Let me know if you still have issues to get started and I will be happy to guide you.

Thanks and best
Axel

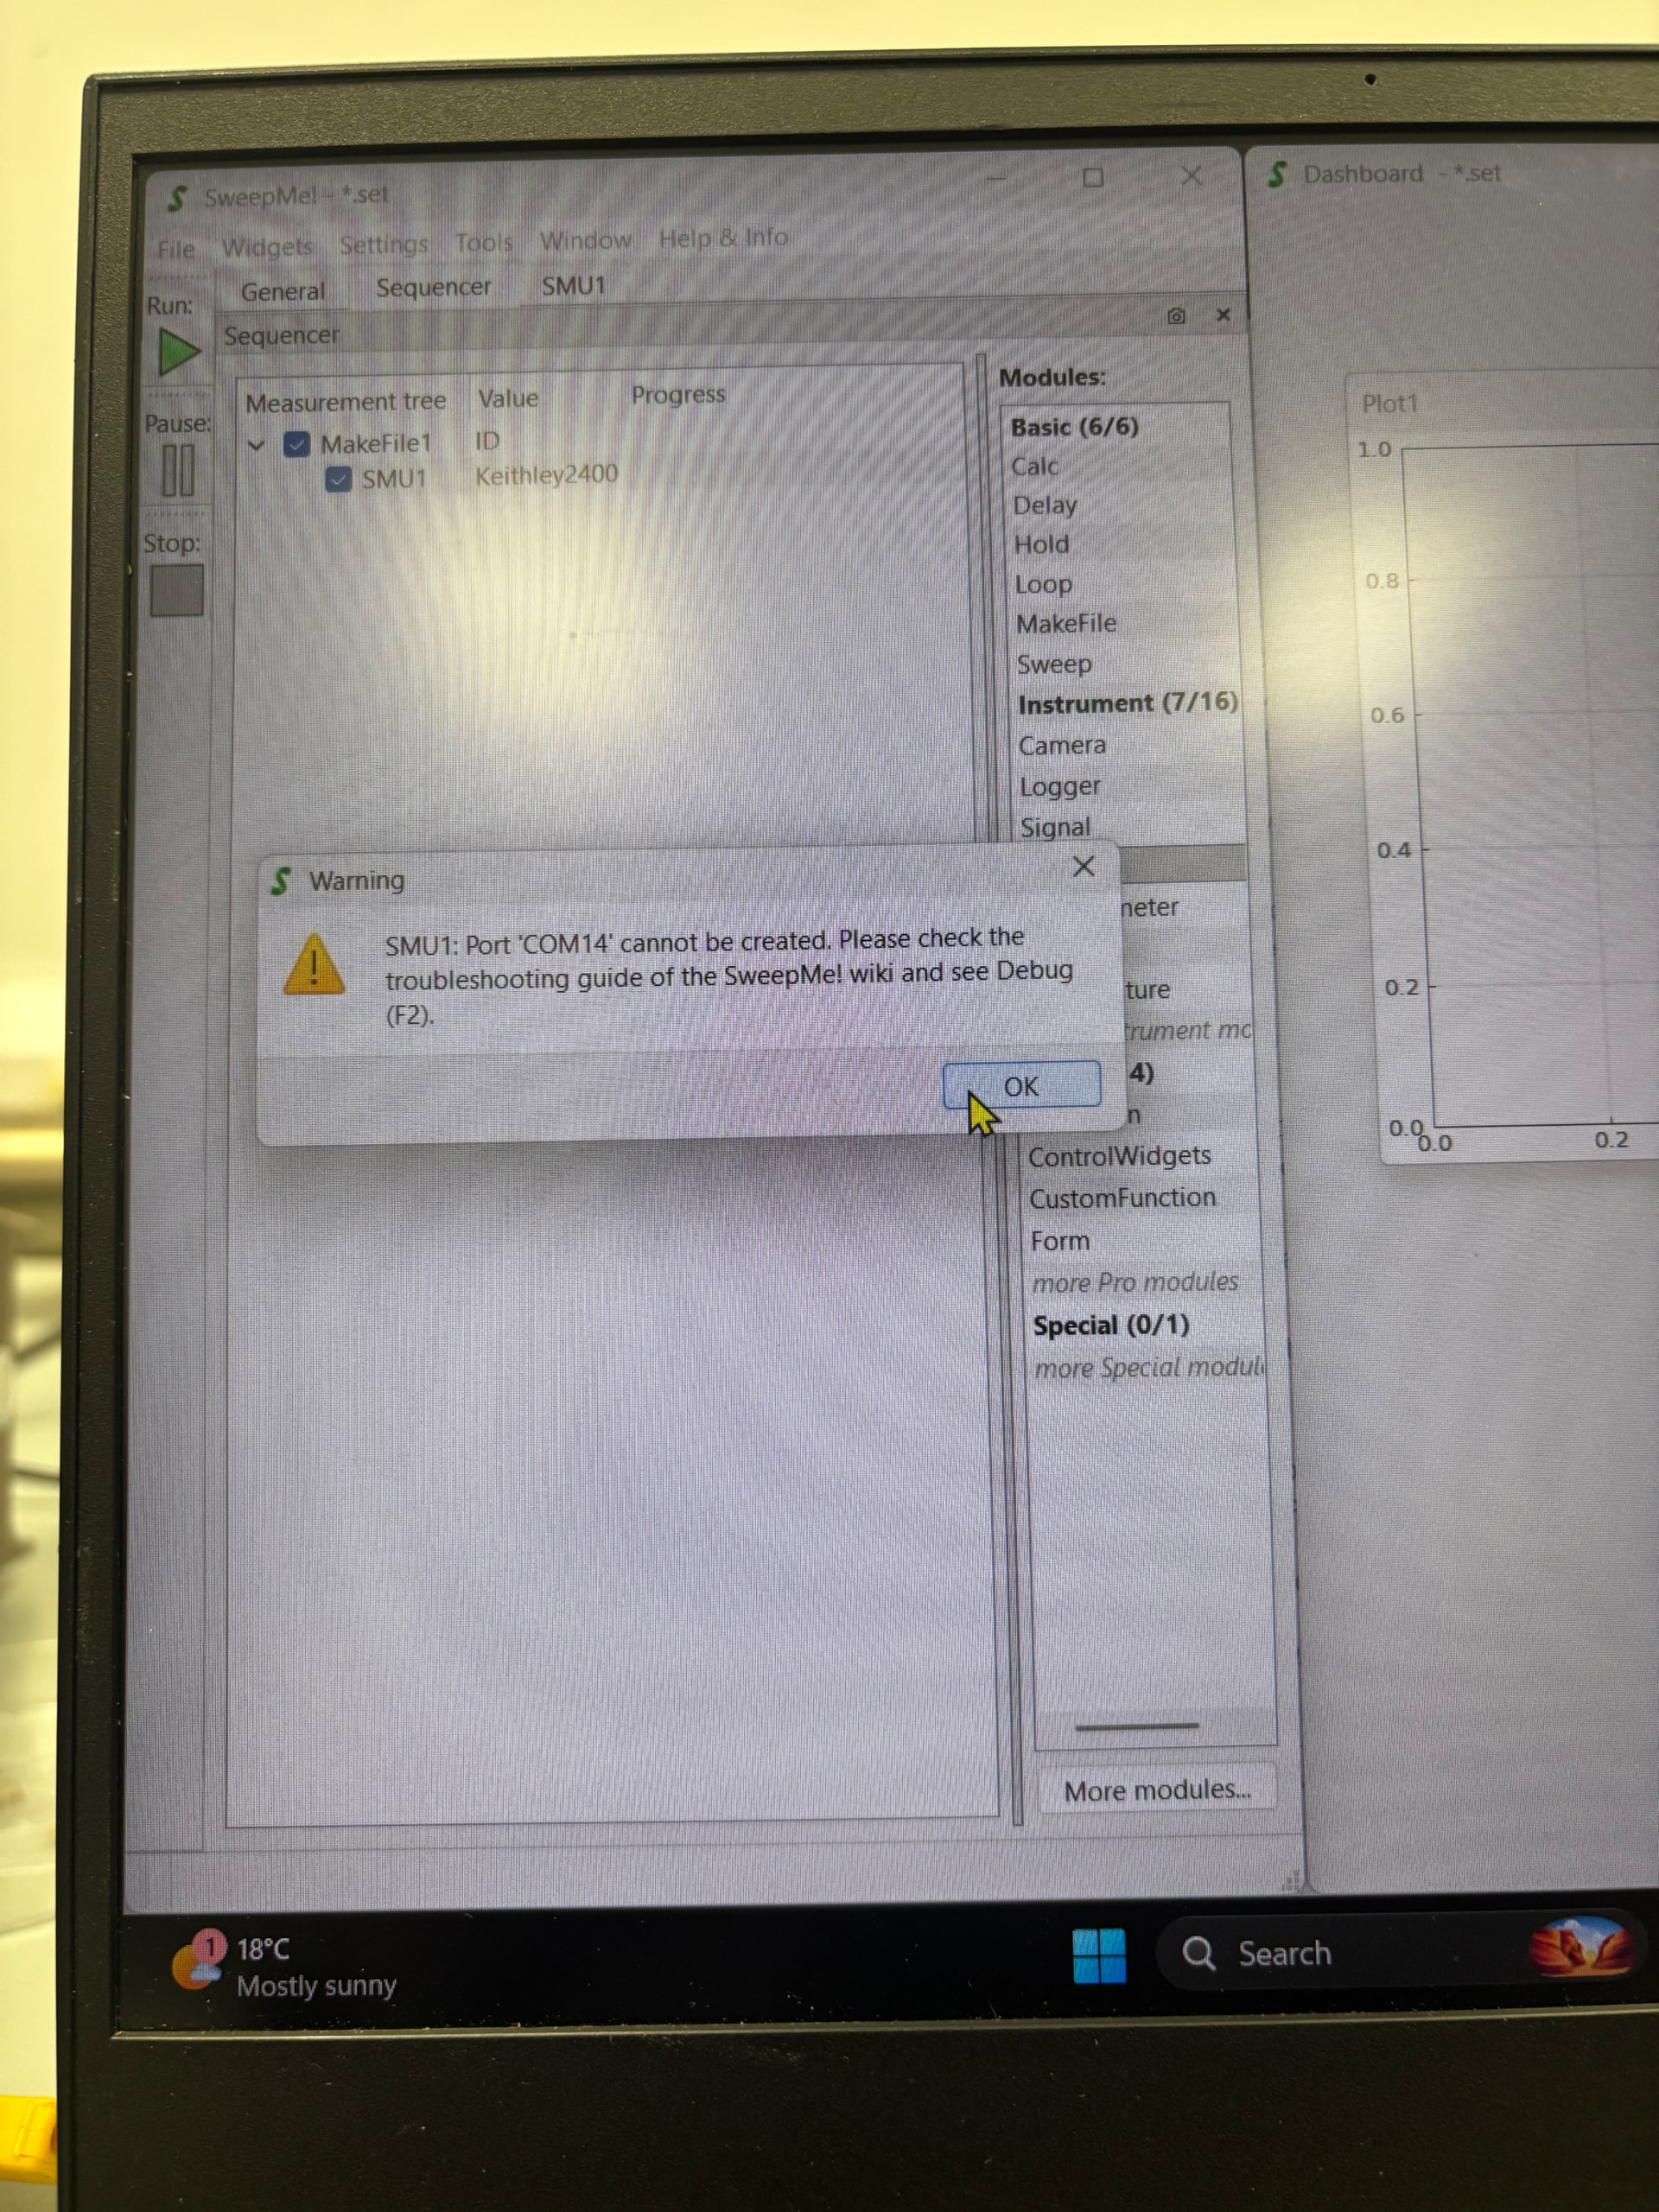
Thankyou for the response. Did all the steps suggested and still facing issues on the same. Have attached the problems shown when tried to Run. Please guide for the same.

1 Like

It seems that you try to use COM14, and thus a serial connection.

Do you use a USB-COM port adapter? Please check whether this adapter is correctly installed in the Windows Device Manager. Is the COM port correct?

There are a couple of further such questions that we have summarized here
https://wiki.sweep-me.net/wiki/Supported_ports#COM
and that you could check.

Also please cross-check that there is no other software running that is using the COM port at the same time.

Feel free to share any information with us that could help us to identify the problem and guide you to the solution.

Thanks and best
Axel

Its working now! Thanks for the help..

Just one last thing, how do you set up a constant voltage lets say for 10V on the Sweepme? I saw a few videos to be set up for the Keithley, but once I run, its not adhering to what is set up.

With regards,

Avaneesh Ramakrishna Rao.

1 Like

Great, let us know what solved your problem so that others might be able to apply the same solution.

To apply a constant voltage use the Sweep editor that is part of the SMU module and use the same value for start and end value of the sweep. This way you create a single voltage set value. Basically, it is special case of a sweep, where you just have one value, i.e. it is constant then.

To repeat the readout you can set the Loop column of the SweepMe! editor to a higher number like 1000 to repeat the measurement 1000 times. Alternatively, you can add a Loop module to the Sequencer and add there the number of repetitions. With a Delay module you can make sure your get equidistant readings in time or leave it out if you like to measure as fast as the SMU can react.

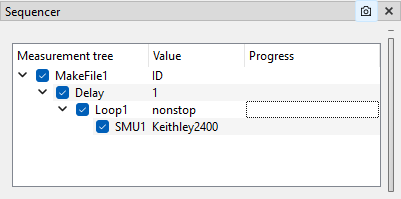
Here is a sequence that will run forever and takes every second a reading with a Keithley 2400 at 10 V:

Just copy and paste the string into an empty sequencer to test it:

{
  "child_items": [
    {
      "child_items": [
        {
          "child_items": [
            {
              "child_items": [
                {
                  "child_items": [],
                  "is_checked": true,
                  "is_expanded": true,
                  "module_details": {
                    "module_type": "SMU",
                    "Label": "SMU1",
                    "value": "",
                    "Device": "SMU-Keithley_2400",
                    "Channel": "",
                    "Port": "COM6",
                    "SweepValue": "SweepEditor",
                    "SweepMode": "Voltage in V",
                    "RouteOut": "Front",
                    "4wire": false,
                    "Compliance": "0.0001",
                    "SkipCompliance": false,
                    "Speed": "Fast",
                    "Range": "Auto",
                    "RangeVoltage": "Auto",
                    "Average": "1",
                    "Parameters": {},
                    "Configuration": "",
                    "PostProcessingResistance": false,
                    "PostProcessingConductance": false,
                    "PostProcessingPower": false,
                    "ShowPulse": false,
                    "CheckPulse": false,
                    "PulseCount": "1",
                    "PulseOffLevel": "0",
                    "PulseOnTime": "200e-6",
                    "PulseOffTime": "200e-3",
                    "PulsePeriod": "1e-3",
                    "PulseDelay": "0.0",
                    "PulseMeasStart": 50,
                    "PulseMeasTime": 30,
                    "PulseRiseTime": "100e-9",
                    "PulseFallTime": "100e-9",
                    "PulseImpedance": "200e-3",
                    "SweepEditor": {
                      "sweeps": [
                        {
                          "loop": "1",
                          "start": "10.0",
                          "end": "10.0",
                          "step_points": "0.1",
                          "scaling": "Step width",
                          "hold": "0.0"
                        }
                      ]
                    },
                    "ListSweepCheck": true,
                    "ListSweepType": "Sweep",
                    "ListSweepStart": "0.5",
                    "ListSweepEnd": "1.0",
                    "ListSweepStepPointsType": "Step width:",
                    "ListSweepStepPointsValue": "0.1",
                    "ListSweepDual": false,
                    "ListSweepCustomValues": "",
                    "ListSweepHoldtime": "0.1",
                    "ListSweepDelaytime": "0.1",
                    "Comment": ""
                  }
                }
              ],
              "is_checked": true,
              "is_expanded": true,
              "module_details": {
                "module_type": "Loop",
                "Label": "Loop1",
                "value": "nonstop",
                "Repetitions": "0",
                "UseReduction": false,
                "MaxPoints": 10000,
                "Reduction": "Quadratic",
                "KeepLastPoints": 10,
                "Comment": ""
              }
            }
          ],
          "is_checked": true,
          "is_expanded": true,
          "module_details": {
            "module_type": "Delay",
            "Label": "Delay",
            "value": "1",
            "Comment": ""
          }
        }
      ],
      "is_checked": true,
      "is_expanded": true,
      "module_details": {
        "module_type": "MakeFile",
        "Label": "MakeFile1",
        "value": "ID",
        "FileID": "ID",
        "ShowAdvancedOptions": false,
        "BranchIndex": true,
        "FileIndex": true,
        "ModuleLabels": true,
        "Comment": ""
      }
    }
  ],
  "data_type": "Sequencer",
  "version": "v1",
  "sweepme_version": "1.5.8.7"
}

Thanks and best,
Axel

Hi Axel,

I have been looking at Current readings with respect to Time with 1V Bias voltage, I observed that the readings take around 10-12seconds long to give out the next reading and hence wanted more accuracy with the same. Is there anything else I can do? Please guide.

Thank you.

With regards,

Avaneesh Ramakrishna Rao.

1 Like

Hi Avaneesh,

10-12 seconds per reading is definitely too long. A Keithley 2400 can easily read more than 10 values per seconds (also depending on measuring range and integration time).

When you use a serial connection with a COM port, there are further port settings that must be correct. They are defined in the driver, but are also described on the webpage of the driver:

https://github.com/SweepMe/instrument-drivers/blob/0751b5232c9b2e2ddde61663429c79be46b7efda/src/SMU-Keithley_2400/main.py#L51

https://sweep-me.net/device/31/Keithley_2400

In the section “Connection” you can read more how to change these port settings via the menu of the instrument.

We use the factory default settings, i.e. a bausrate if 9600 and a terminator character begin Carriage Return (CR = “\r”).

If you instrument uses other options than these, either the measurement cannot be interpreted or you run into a timeout. As you already receive a message, it is save to say that the baudrate is correct. So I guess, you need to change the terminator character in the communication menu of the Keithley 2400.

The current timeout value is set to 10 seconds in the driver. This matches quite well to your observation of a reading once in this time span.

This should be a quick fix. Let us know if it works or not.

Thanks and best
Axel