Hi, I wanted to record the same data point in my sequencer a couple of times in a row to record a time series. So I put a loop at the end of my branch. For my next measurement I need an exponential / log time sampling, e.g. t = 2,4,8,16… How can I use my own function for the time/ hold / delay ?
Thanks for your help!
1 Like
Hi Richard,
thanks for asking. This is possible with just a few clicks using the below sequencer setting:
First, you need a logarithmic variation of values that can be created with the Sweep editor. Here, the module “Sweep” can be added to the sequencer.
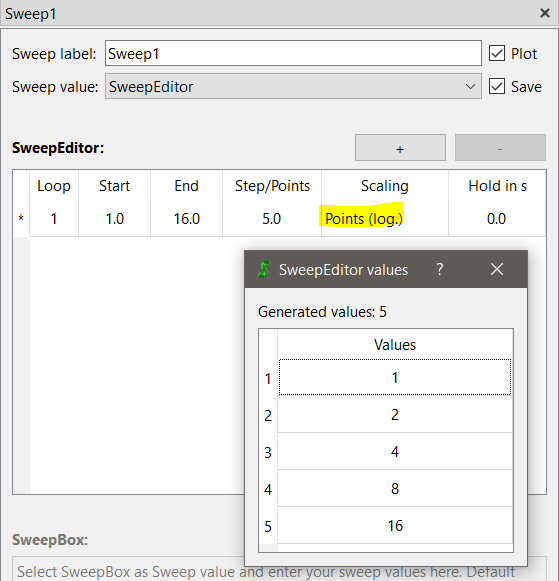
By using the Scaling mode “Points (log.)” you can for example create 5 values from 1 to 16 where the value doubles at each step.
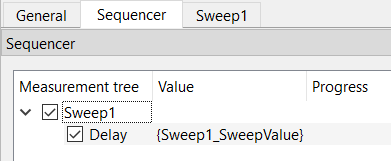
The module “Delay” can now be used to generate a pause between two points. Delay makes sure that a new point is not started before the given time has passed since the start of the previous point.
The trick to handover the sweep value of the Sweep1 module to the Delay is to use the parameter syntax based on a string with curly brackets {…}.
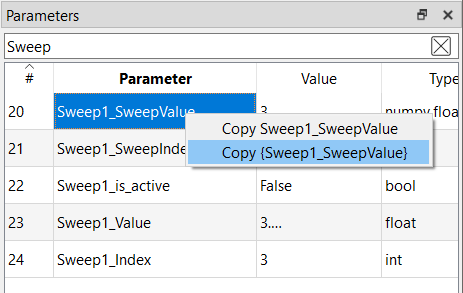
You can find parameters registered in the system using the widget “Parameters” (key F3). A table with all parametes will pop up in the Dashboard where you can filter and copy the parameter via right-click menu:
Let’s enter the value into the Delay module:
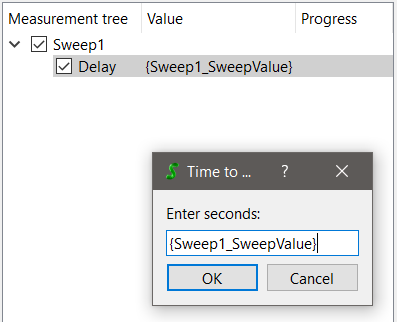
Just double-click the Delay module or right-click on the module and select “Configure”. Instead of entering a fixed value, you now insert the parameter as shown in the image above. Please make sure you copied the parameter including the curly brackets indicating SweepMe! that the content should be evaluated as parameter.
If you run this measurement, you will see that the pause at each step is getting longer and longer.
Now, you can add instrument modules that load instrument drivers to perform measurement at each repetition of the Sweep1 module. However, Delay can only keep the exact timing if the measurement does not take longer than the given time interval.
Alternatively, you can also use the module “Hold” that has a similar handling like Delay but it waits a given time between applying and measuring values. If you just log values with a sensor, it becomes very similar to Delay, but a difference is that it always adds a wait time independent from the time that passed since the start of the last measurement point.
You can copy the below string (just use the small button in the top-right corner) and paste it via right-click menu into an empty sequencer. This works from SweepMe! 1.5.6 on and is a simple way to share sequencer settings or just parts of it.
{
  "child_items": [
    {
      "child_items": [
        {
          "child_items": [
            {
              "child_items": [],
              "is_checked": true,
              "is_expanded": true,
              "module_details": {
                "module_type": "Delay",
                "Label": "Delay",
                "value": "{Sweep1_SweepValue}",
                "Comment": ""
              }
            }
          ],
          "is_checked": true,
          "is_expanded": true,
          "module_details": {
            "module_type": "Sweep",
            "Label": "Sweep1",
            "value": "",
            "SweepValue": "SweepEditor",
            "Plot": true,
            "Save": true,
            "SweepEditor": {
              "sweeps": [
                {
                  "loop": "1",
                  "start": "1.0",
                  "end": "16.0",
                  "step_points": "5.0",
                  "scaling": "Points (log.)",
                  "hold": "0.0"
                }
              ]
            },
            "SweepBox": {
              "sweep_values": ""
            },
            "Comment": ""
          }
        }
      ],
      "is_checked": true,
      "is_expanded": true,
      "module_details": {
        "module_type": "MakeFile",
        "Label": "MakeFile1",
        "value": "ID",
        "FileID": "ID",
        "ShowAdvancedOptions": false,
        "BranchIndex": true,
        "FileIndex": true,
        "ModuleLabels": true,
        "Comment": ""
      }
    }
  ],
  "data_type": "Sequencer",
  "version": "v1"
}
2 Likes
Here is another even more flexible way to achieve the same:
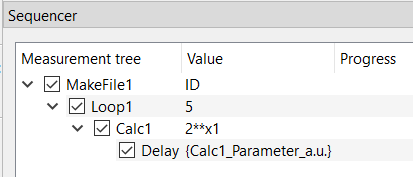
A Loop module creates a repetition. This can be also set to nonstop, but waiting times could increase very quickly ![]()
A Calc module can now be used to calculate any waiting time depending on the Loop1 index.
Again the value created by the Calc module is forwarded to the Delay module using the Parameter syntax.
You can copy the json-string below and paste it into an empty sequencer to test it yourself. (SweepMe! 1.5.6 needed)
{
  "child_items": [
    {
      "child_items": [
        {
          "child_items": [
            {
              "child_items": [
                {
                  "child_items": [],
                  "is_checked": true,
                  "is_expanded": true,
                  "module_details": {
                    "module_type": "Delay",
                    "Label": "Delay",
                    "value": "{Calc1_Parameter_a.u.}",
                    "Comment": ""
                  }
                }
              ],
              "is_checked": true,
              "is_expanded": true,
              "module_details": {
                "module_type": "Calc",
                "Label": "Calc1",
                "value": "",
                "Variable": "Parameter",
                "Unit": "a.u.",
                "Function": "2**x1",
                "Plot": true,
                "Save": true,
                "Execution": "Before each point (before 'start')",
                "Value1": "Loop1 Index",
                "Value2": "",
                "Value3": "",
                "Comment": ""
              }
            }
          ],
          "is_checked": true,
          "is_expanded": true,
          "module_details": {
            "module_type": "Loop",
            "Label": "Loop1",
            "value": "5",
            "Repetitions": "5",
            "UseReduction": false,
            "MaxPoints": 10000,
            "Reduction": "Quadratic",
            "KeepLastPoints": 10,
            "Comment": ""
          }
        }
      ],
      "is_checked": true,
      "is_expanded": true,
      "module_details": {
        "module_type": "MakeFile",
        "Label": "MakeFile1",
        "value": "ID",
        "FileID": "ID",
        "ShowAdvancedOptions": false,
        "BranchIndex": true,
        "FileIndex": true,
        "ModuleLabels": true,
        "Comment": ""
      }
    }
  ],
  "data_type": "Sequencer",
  "version": "v1"
}
2 Likes
Last but not least, you can also replace the Calc module in the previous second example with the Add-on module CustomFunction. Then you get a lot of freedom to create any function returning a waiting time that could for example depend on your last measurement result.
2 Likes